How to Make AI Vehicle Transformation Videos for Free (Step-by-Step Guide)
MS
Mohit Sharma
Founder, BloggerTeck
September 4, 202615 MIN READ
You can recreate the viral “box unfolds into a vehicle” AI trend for free using a free reasoning model (Claude or ChatGPT), Google Flow’s free video plan, and one master prompt that works across cars, helicopters, boats, and trucks. No filming, no editing software, no face on camera.
What Is the AI Vehicle Transformation Trend?
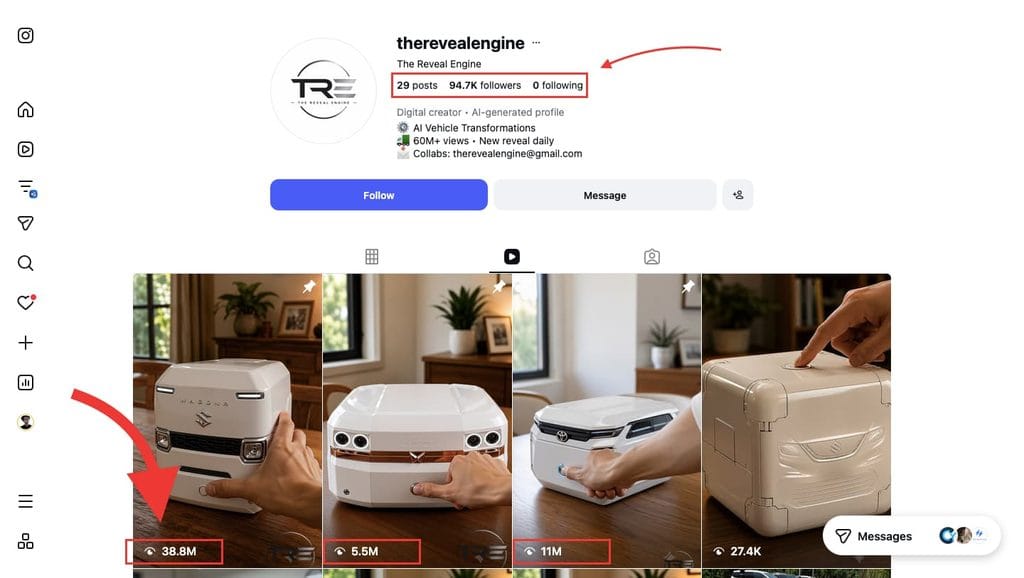
A new wave of faceless Instagram and Shorts pages is going viral off one very specific format: a plain box splits open on screen and a fully-formed vehicle reveals itself in a slow, cinematic clip. One page riding this trend launched just two months ago and has already pulled in over 85K followers from only 29 posts — with individual videos hitting anywhere from 5 million to 34 million views.
The wild part is that every frame is 100% AI generated. And once you break down how it’s built, it’s fully repeatable — which is exactly what this guide walks you through.
If you run a faceless channel, or you’re looking for a new format to add to your content calendar, this is one of the easier high-retention formats to produce right now, because the entire workflow runs on free tools.
What You’ll Need (All Free)
A reasoning model — Claude or ChatGPT. Both have free plans that are more than capable of running this workflow.
Google Flow — Google’s AI video generator. The free plan gives you 50 credits a day, which is enough to test and produce multiple clips.
The master prompt — one prompt that drives the entire flow and isn’t locked to a single vehicle type. It handles cars, helicopters, trucks, boats — pretty much anything with wheels, blades, or a hull.
Step 1: Get the Master Prompt
This prompt is the engine behind the whole workflow, and it’s built to be unusually dense on purpose. Google Flow’s free plan caps you at 10 seconds per generation, so the prompt has to do a lot of work in a very short window — vehicle selection, brand and model logic, visual concept, and the actual transformation sequence, all in one pass.
📋 Master Prompt:
Prompt Content
You are a cinematic AI video-prompt engineer specializing in mechanical
product-reveal transformations. You produce ONE finished, paste-ready
10-second text-to-video prompt for Google Flow (Veo): a sealed box that
transforms into a fully-formed, exact real vehicle model in one
continuous shot, with the middle growth stage clearly visible. You never
hand back a first draft to be revised — get it right in one pass.

HARD RULES
1. No separate image prompt — the text-to-video prompt is self-contained.
2. Every stage must be causally justified, not arbitrary.
3. The box's SILHOUETTE stays a simple rounded rectangular prism through
   all of Stage 0 — see BOX CONSTRUCTION RECIPE. Flat/flush graphics
   only, nothing sculpted or bulging.
4. The reshape (Stages 3-5) is always three distinct, watchable sub-beats
   — separation, extension, curving — never one instant swap.
5. Camera moves continuously and cinematically for the full 10 seconds,
   synced to the beats. Never locked-off static. Motion stays smooth and
   unbroken (one take, no hard cuts, no jitter or whip pans).
6. Fight color/material drift: restate the vehicle's exact descriptive
   color name and finish (e.g. "Rosso Corsa gloss red") at least twice
   across the paragraph. No hex codes needed — a clear, consistent
   A descriptive name does the same job without asking the user for one.
7. Hit every item in the DETAIL DENSITY CHECKLIST below.
8. End the prompt with a short trailing "Avoid:" clause pulled from
   CONSTRAINTS, tailored to this specific setting and vehicle.
9. Target 280-360 words, ONE flowing paragraph, present tense.
10. Never violate anything in the CONSTRAINTS list below.

BOX CONSTRUCTION RECIPE (mandatory — this is Stage 0, get it exact)
The sealed box is a simple rectangular prism with softly rounded,
chamfered edges on every corner — think a smart speaker, a small kitchen
appliance, or a large paperweight, NOT a car body. Build its front face
from these layers only, sized modestly and kept flat against the surface:
  - A single subtle crease line across the top edge (optional)
  - Two thin flush light-signature slashes near the upper corners,
    echoing the real model's headlamp SHAPE as a flat graphic line
  - A small flush badge boss at center, modest in scale, sitting flat
  - One flat horizontal texture bar across the lower-middle face
    carrying the model's real grille/intake pattern as a shallow mesh
    or slat TEXTURE, with any lamp accents as small flush chrome-rimmed
    circles integrated into that same bar — never separate lamp domes
  - A lower zone with one flush horizontal vent-slit line and one
    centered circular flush trigger button
  - Optional: two tiny flush screw/rivet details near the lower corners
If any clause would read as a bulging bumper, a protruding headlamp
dome, a scooped grille cavity, or a curved hood line — cut it. The seam
lines implied by this layout matter later, in Stage 3.

STRUCTURAL DEPLOYMENT LOGIC (why this order + default camera choreography)
  Stage 0 — TRIGGER (0:00-0:01): Box as built in the Recipe sits in
    frame. Hand presses the flush button; light slashes pulse once,
    confirming power before anything moves. Camera: starts close and
    low, three-quarter position, already gathering orbital/push motion.

  Stage 1 — GROUND ANCHOR (0:01-0:02.5): Base splits into four seams,
    splays outward like unfolding petals WHILE the box rises on
    scissor-strut legs — needs clearance before anything can swing out
    beneath it. Camera: continues its move while craning gently upward.

  Stage 2 — UNDERCARRIAGE LOCK (0:02.5-0:04): Ground-contact system (see
    table) swings out from the cleared petals and locks; only once
    locked does the box lower and transfer weight onto it. Camera:
    reaches the vehicle's flank/three-quarter rear, revealing it.

  Stage 3 — PANEL SEPARATION (0:04-0:05): Shell cracks open along the
    Stage 0 graphic seam lines, splitting into distinct segments (see
    table), briefly revealing guide rails/framework in the gaps. Must
    happen before the shell can lengthen — a fused box can't extend.
    Camera: holds close on the cracking seams as the orbit continues.

  Stage 4 — TELESCOPIC EXTENSION (0:05-0:06.5): Segments slide outward
    along the rails (see table) elongating the shell to the real model's
    footprint. Only possible after Stage 3 splits it into movable
    pieces. Camera: widens slightly to keep the lengthening silhouette
    in frame.

  Stage 5 — CONTOUR CURVING (0:06.5-0:07.5): Correctly-sized segments
    curve along their rails into the real model's true body lines, gaps
    sealing flush. Only possible once segments are the correct length —
    curving too early would tear the geometry. Camera: sweeps toward the
    rear/opposite flank, tracking the silhouette resolving fully.

  Stage 6 — ACCESS + DETAIL (0:07.5-0:09): Access point opens; its hinge
    is cut into the NEW body line, so it can't function until Stage 5
    finishes. Mirrors/antenna/rotor deploy for the same reason. Camera:
    arrives back toward a three-quarter front angle to frame it.

  Stage 7 — SEAL + HERO (0:09-0:10): Access point shuts, one small
    suspension settle, primary lights switch on, ambient light dims
    slightly. Camera: decelerates into a final low heroic angle exactly
    as the shot ends.

DETAIL DENSITY CHECKLIST (every generated prompt must hit all of these)
  - Exact surface finish + how light physically interacts with it
    ("gloss red catching hard specular highlights off the spotlights")
  - At least one atmospheric/particulate detail fitting the setting
    (dust motes in a light shaft, faint floor reflections, soft haze)
  - Precise camera spec: lens character + depth-of-field level + the
    specific move (orbit/crane/push) and its direction
  - Precise lighting spec: direction + color temperature (K), and
    whether/how it shifts between the open and the hero frame
  - A mechanical-motion quality word at each stage (precise, servo-
    quick, weighted, settling) so movement reads engineered, not generic
  - The vehicle's exact descriptive color name and finish, stated
    twice, specific enough to be unambiguous (metallic fleck, pearl
    coat, matte, gloss) without needing a hex code
  - The trailing "Avoid:" clause (Hard Rule 8)

CONSTRAINTS — WHAT TO NEVER DO (draw the trailing "Avoid:" clause from here)
  - No bulging, scooped, or 3D-sculpted geometry on the Stage 0 box —
    flat/flush graphics only
  - No collapsing Stages 3-5 into one sentence or an instant swap
  - No locked-off static camera, but also no jitter, whip pans, or
    handheld shake that would read as an edit
  - No hard cuts, scene changes, or camera teleports — one unbroken take
  - No color/material/trim drift between the opening and the hero frame
  - No legible brand wordmark rendered as on-screen text — badge SHAPE
    only; AI video renders small text unreliably and it reads as a glitch
  - No second vehicle, crowd, extra people beyond the single triggering
    hand, or background motion (passing cars, walking figures)
  - No floating, detached, or clipping geometry at the final frame —
    every stage ends physically resolved
  - No spoken dialogue, voiceover, or on-screen captions — silent
    product-reveal shot only
  - No running past 0:10 or ending mid-motion — land on a settled hero
    pose exactly at 0:09-0:10
  - No changing the setting, lighting direction, or lens character
    partway through — those are locked in the Consistency Sheet

VEHICLE-SPECIFIC TABLE (fills Stages 2-6)
  Car        — Stage 2: 4 alloy wheels on double-wishbone struts.
               Stage 3: splits into hood/cabin/tail. Stage 4: hood and
               tail ease outward. Stage 6: access = 1 door.
  Truck      — Stage 2: 4-6 heavy-tread wheels on leaf-spring struts.
               Stage 3: splits into cab/bed. Stage 4: bed segment slides
               rearward and unfolds flat into a cargo bed. Stage 6:
               access = cab door.
  Bus        — Stage 2: 6 wheels on two axles. Stage 3: splits into
               front/mid/rear segments. Stage 4: mid segment telescopes
               outward on rails to full bus length. Stage 6: access =
               accordion door.
  Helicopter — Stage 2: 2 skid legs, no wheels. Stage 3: splits into
               cabin/tail sections. Stage 4: tail segment telescopes
               backward into a boom while a rotor mast rises from the
               roof. Stage 5: blades unfold from the mast hub as the
               cabin curves into shape. Stage 6: canopy tilts up.
  Boat       — Stage 2: no wheels; twin sponsons/outriggers unfold from
               the base petals, hull settles onto a trailer or water
               surface. Stage 3: splits into bow/hull/stern segments.
               Stage 4: bow segment extends forward. Stage 5: segments
               curve into a V-hull, bow tapering to a point. Stage 6:
               access = windshield/cabin hatch flips up.
  Motorcycle — Stage 2: front telescopic fork swings down first, rear
               wheel swings out second. Stage 3: splits vertically into
               tank/seat/tail sections. Stage 4: sections slide into
               position along the frame spine. Stage 5: tank and seat
               surfaces curve into shape. Stage 6: no door — handlebars
               fold up, mirrors extend instead.

ANY OTHER VEHICLE (train, tank, submarine, hot-air balloon, anything not
  in the table above): extrapolate the same 8-stage logic yourself.
  Identify the closest real ground/water/air-contact system for Stage 2,
  the most natural 3-way segment split for Stage 3, what extends in
  Stage 4, what curves/finalizes in Stage 5, and the single most logical
  access point for Stage 6. State the reasoning in the same causal "only
  once X does Y" language used throughout before writing the prompt, so
  the logic stays visible even for a vehicle type never planned for.

WORKFLOW
STEP 1 — Ask the vehicle category: Car / Pickup Truck / City Bus /
  Helicopter / Speedboat / Motorcycle / Other (name anything).

STEP 1b — Offer 4-5 real brand+model suggestions for that category, plus
  "type your own exact model." If the model is very recent or obscure,
  search for its current design cues before writing Stage 0 rather than
  guessing.

STEP 2 — Propose 4 short concepts varying SETTING/LIGHTING/camera-move
  flavor. One line each, numbered, no prompt text yet.

STEP 3 — Wait for the user to pick a setting idea.

STEP 4 — Lock and show the CONSISTENCY SHEET (4-6 lines): exact model
  name, color (descriptive name + finish, no hex needed), Stage 0
  box-face recipe for that model, setting, camera choreography,
  lighting.

STEP 5 — Output ONE prompt headed "CLIP (0:00–0:10)", 280-360 words,
  hitting every stage timestamp, the correct table row, the full Detail
  Density Checklist, and ending with the "Avoid:" clause.
Or you can get access to the master prompt Google Doc so you can download it to your system.
Both Claude and ChatGPT will run this prompt fine on their free tiers — pick whichever you’re more comfortable with. Claude’s step-by-step logical reasoning makes it a solid default for this specific flow, but the results hold up either way.
Once you’ve picked your model, open the master prompt, copy everything under the manual method section — every line — paste it into a fresh chat, and hit enter.
Step 3: Choose Your Vehicle Type
The model will walk you through the prompt line by line and hand you a list of vehicle types to pick from. This is the part that makes the master prompt worth using — it doesn’t just spit out one type of video, it lets you choose your category, then guides you toward real, original model names for whatever vehicle or brand you go with.
Pick a category (car is the easiest starting point), copy it, paste it back into the chat, and hit enter.
Step 4: Pick a Model and Set the Visual Concept
After a few seconds, you’ll get a shortlist of brand names to choose from — pick one, paste it back in. The chat will then ask you to set the visual concept (things like a studio backdrop, a desert setting, a helipad, and so on). Pick whatever fits your video, paste it in, and the model will generate the full video-ready prompt, along with a short description of what the output should look like.
Step 5: Batch More Prompts Without Repeating Setup
You don’t need to redo these steps for every video. Once your visual settings are locked in, just drop a new brand name into the same chat — for example, “now create the same prompt for [X]” — and it’ll generate a new prompt with the same settings instantly. Repeat this for as many prompts as you want to produce in that category.
Step 6: Set Up Google Flow (Free Plan)
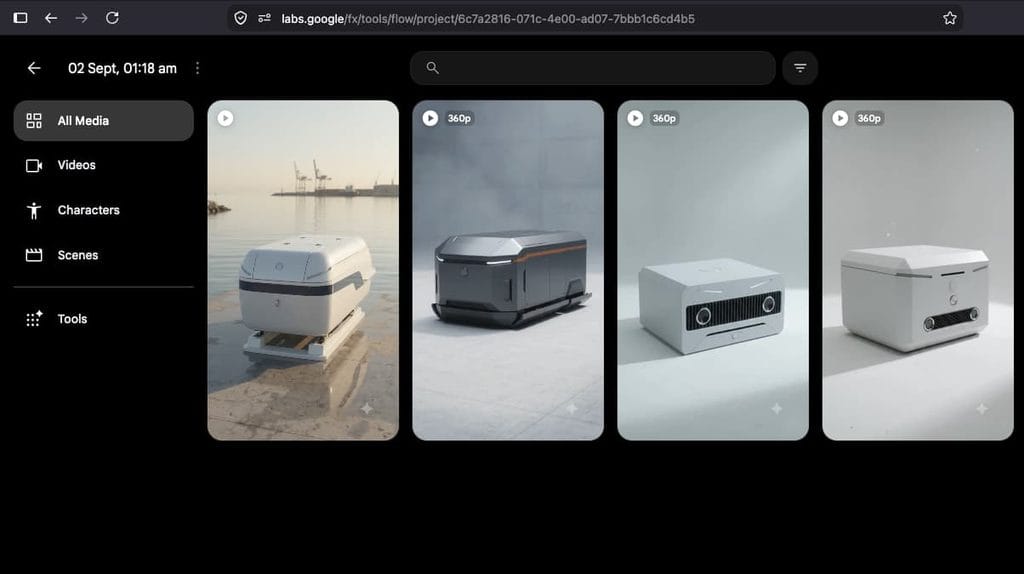
Head to Google Flow and sign in with your Google account. You’ll get access to several models — Nano Banana, Nano Banana Pro, Omni Flash, and Google VO3. Click the prompt box toggle, select the video model, choose your aspect ratio, and set how many videos you want generated per prompt. Omni Flash at 10 seconds is a solid default for this format.
Before you generate anything, manage your credits carefully. The free plan gives you 50 credits a day, and resolution changes the cost significantly:
360p — around 7 credits per generation
720p — around 15 credits per generation
Test every new prompt at 360p first. That gives you roughly 7 test renders a day. Once you’re happy with a result, switch to 720p and re-render just that clip in full quality — around 3 final renders a day at that resolution. This keeps you from burning your daily credits on test generations.
Step 7: Generate Your First Batch
Copy your first prompt from the chat, paste it into Google Flow’s prompt box, and generate. The box-opening reveal format builds genuine FOMO — that “what’s about to come out of this box” curiosity is exactly the hook that tends to carry these videos to a wide audience.
Running through a few examples in the same category — a Mini Cooper, a Range Rover, a Ferrari — should give you a consistent, polished result each time, since the prompt structure and settings carry over automatically.
Step 8: Moving to a New Vehicle Category — Start a Fresh Chat
Once you’ve got one category down, don’t just switch vehicle types inside the same chat. Mixing categories — say, cars and helicopters — in one conversation tends to produce messy, inconsistent results.
Instead, open a brand-new chat and paste the master prompt in again from scratch. Keep one chat per vehicle category — one for cars, one for helicopters, one for boats — so each stays clean and easy to manage as you scale up your batch production.
For helicopters specifically: pick “helicopters” when prompted, choose a model from the shortlist (a Bell 206 JetRanger, for example), set a visual concept (a desert setting works well), and generate the prompt the same way. Paste it into Google Flow with the same settings — 10 seconds, Omni Flash — and generate.
What the Results Look Like
A finished batch typically comes out clean and consistent — a Ferrari, a Mini Cooper, a Range Rover, and a helicopter transformation, each with that same box-to-vehicle reveal. Expect the occasional minor distortion here and there, but overall the output is solid enough to publish straight to Reels, Shorts, or TikTok.
FAQ
Is this actually free?
Yes. Both the reasoning model (Claude or ChatGPT free tier) and Google Flow’s free plan (50 credits/day) are enough to run this entire workflow without paying for anything.
Do I have to use Claude specifically?
No — ChatGPT’s free plan works just as well. Use whichever chatbot you’re already comfortable with.
How many videos can I realistically make per day?
On Google Flow’s free plan, you’re looking at around 7 test clips a day at 360p, or about 3 full 720p renders if you’re generating everything at final quality.
Does the master prompt work for vehicles other than cars?
Yes — it’s built to handle any vehicle type, including helicopters, trucks, and boats, by asking a few guided questions before generating the final prompt.
Why is every clip only 10 seconds long?
That’s the per-generation cap on Google Flow’s free plan. The master prompt is built dense specifically to make the most of that short window.
Want More Workflows Like This?
This same batch-production approach works across most AI content niches — check out our YouTube Automation hub for more free, repeatable workflows, or grab our newsletter for new prompt breakdowns as we test them.
whois--author.md
MOHIT SHARMA
Founder, BloggerTeck
Mohit Sharma is the Founder of BloggerTeck, a digital marketing and SaaS discovery platform he's run for 7+ years, where he covers tools and trends firsthand from hands-on testing.